Wow, I thought I was ambitious for knitting socks on the bus. This woman is hand-quilting on a standing room only sky train.
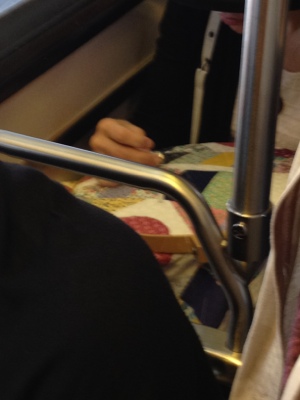
Wow, I thought I was ambitious for knitting socks on the bus. This woman is hand-quilting on a standing room only sky train.
I thought I would branch out here and do a little how-to on my zigzag quilt, in case you are a novice like me who needs some assistanc in figuring these out. Â I say novice and not beginner, because I do assume some quilting and sewing basics. If you are a total newbie, I highly recommend checking out books from the library like Elizabeth Hartman’s Practical Guide to Patchwork or Denyse Schmidt Quilts, both of which go over the basics of quilting.
My finished quilt was approximately 50″ by 50″, so it was a generous baby-size quilt, or even lap quilt.
What you need:
8 half-yards of fabrics of your choice (a total of 4 yards) (a half-yard is 18″ x 45″)
Rotary Cutter/Mat and Ruler
Note that you will also need batting and additional fabric for the back; there are many good tutorials out there on how to make a quilt sandwich, attach binding and actually quilt it all together, so this is just a tutorial (oooh fancy-schmancy word!) for how to make the quilt top, and I refer you to the books above for other steps.
I will also suggest that you read through all the instructions below so you know what the purpose of each step is. If anything is unclear, please let me know and I’ll try to revise this. I haven’t ever tried to write a tutorial before and I’m learning it’s not as easy as it seems.
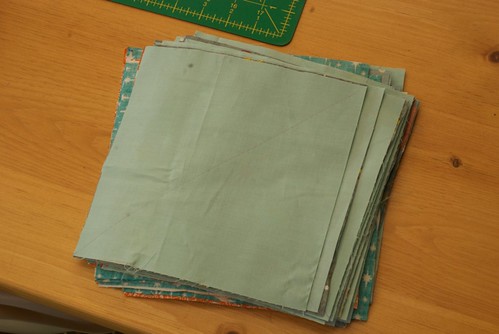
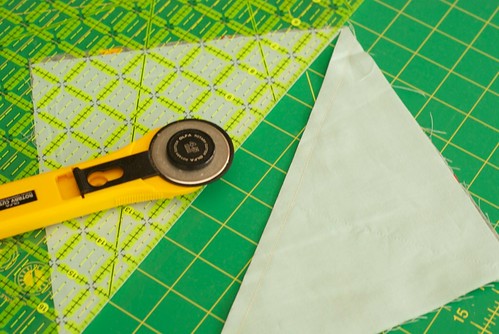
1. First! Fold your half-yard in half, selvedge to selvedge, and cut it into two strips 8″ wide. Then cut those strips horizontally into 8″ squares. Repeat with the remaining half-yards: you need 8 8″ squares in each of your fabrics.
Note, that you will have quite a bit of fabric left over. I turned my extra into bias binding and used it to bind my quilt
When you are done you will have 64 squares of fabric, as below.
2. Lay the squares out in the order you want them to be in the quilt; for example, my top row is baby blue, then the grey rocket ships etc.
3. Now this part is a bit hard to explain, but if your first row is baby blue, take FOUR of those eight baby-blue squares, and FOUR of your second row (orange in my case) and pair them up, so you have four piles of two. Set the other squares from each row aside for now.
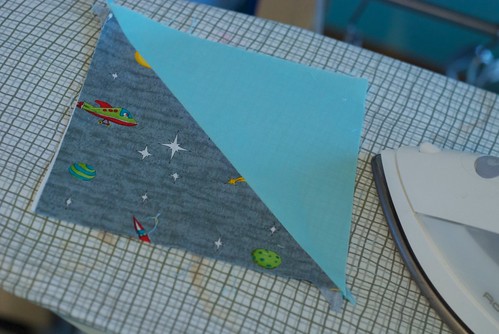
4. Using a washable fabric marker or fabric pencil, draw a diagonal line down the middle of top square in each of your pairs, like in the picture below.Â
In my case, I drew a line down the eight baby blue squares, but not the gray squares. (P.S. If you haven’t tested to see if your fabric marker is washable, DO! Recently, I spent a good deal of time making something and the pencil did not wash out – serious bummer.)
5. Now, you’ve got your line.  Sew the two squares together using by sewing a seam one quarter-inch away from the line.  Then do another line of stitching a quarter-inch from the other side of the line.
Here’s a picture of me sewing a seam down one side using my quarter-inch foot. A quarter-inch foot is a good investment to make sure you get even quarter-inch seams. If you don’t have a quarter-inch foot, you can use the lines on your sewing machine plate to ensure the lines are only a quarter-inch. Whatever you do, make sure ALL the seams are the same width… so if you use a 3/8 width because that’s easiest for you given your sewing machine/feet, make sure ALL seams are 3/8.
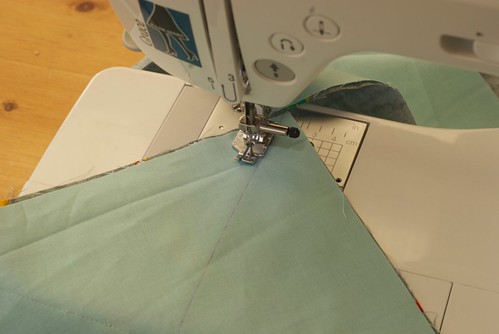
I found it easiest to chain-stitch them, so I sewed all the squares down one side, not cutting the thread between them. Then I fed them through the other way and sewed all the squares on the other side.
In the end, the square should look like this (Ignore the fact that it’s not the baby blue fabric; I guess I was working on a different row when I took this shot.):
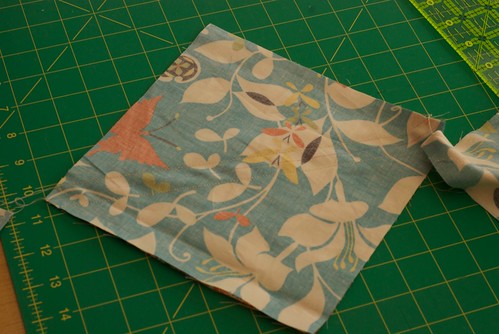
In this shot, you can see the chain stitching (and a crooked seam, which I likely had to redo):
6. Repeat steps 3-5 for the rest of the rows. In my case, I first sewed FOUR blue solid and FOUR orange leaves. Next I would sew four (can I stop capitalizing now?) orange leaves and four grey stars; next I’d do four grey stars and four orange flowers etc. etc. etc.
I know what you’re wondering. You’re thinking, but I cut eight from each fabric, and I only used four from my first row? At the very end you will use the left over four from your first row and combine them with four from your second-to-last row.
7. Snip the chain-stitching between each pair of squares. Now you have 32 pairs of squares… hey, that rhymes.
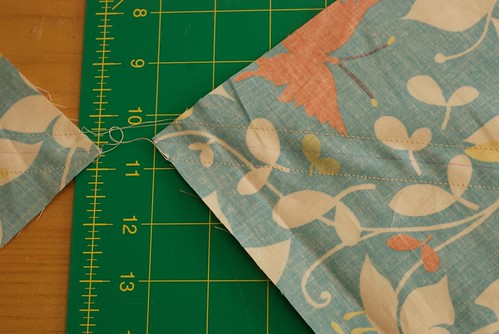
8. Now you are ready to cut. Remember that line you drew earlier, which is now between your two rows of stitching? Using your ruler and your rotary cutter, cut each pair of squares along that line, like so:
9. When you unfold each side of the pair you just cut, you will now have two squares that look like the picture below. Press them open.
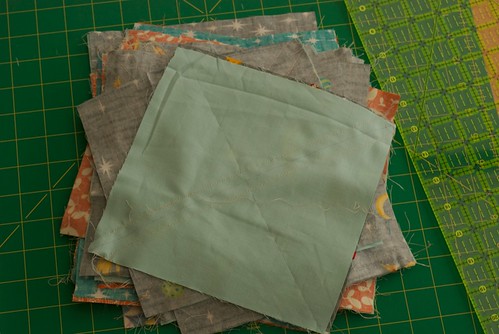
10. Repeat steps 7 – 9 with the rest of your square pairs. You now, once again, have 64 squares, but now they are bicoloured.
11. Lay out your squares in the zigzag pattern, and then sew the first eight of them into one long row (always right sides together!) using a quarter-inch seam. In the picture below, I have sewn three sets of squares into rows. Stop and look after each one you do, as it’s easy to become mixed up and get the alignment wrong, in which case your quilt will not be a zigzag and you will need to get the old seam-ripper out.
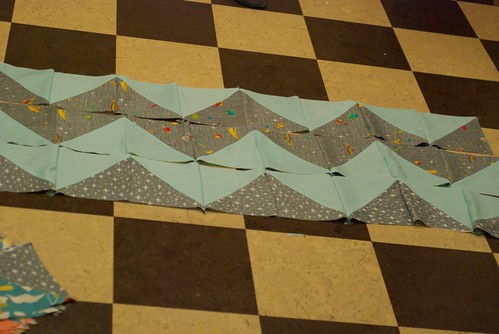
12. Don’t worry that your points look like this, as the extra fabric at the end of each point will disappear when you sew the rows together.
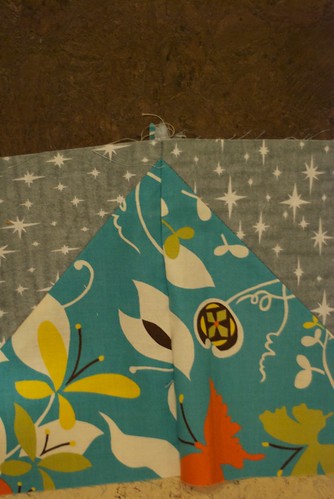
13. Sew each of the rows of 8 squares to the next row.
At this stage, it really helps to pin the rows together at each corner to make sure all the squares come together exactly at the seams, or at least as close as you can get. It may be that some of your squares are not exactly the same size, either because your seams weren’t all exactly the same, or your cutting was off by a bit. While it’s important to be as exact as you can, you can “cheat” a bit and play with the fabric stretching it slightly to get those points to match. In the end, don’t obsess over it because the recipient of your beautiful quilt certainly won’t.
Here’s a picture of the rows pinned together:
14. And that’s it! But I feel like it’s unlucky to have 13 steps, so I’m making it 14.  Once you’ve sewn the rows together, the quilt-top is done. As I mentioned above, I suggest Elizabeth Hartman’s site, or her book for tutorials on the next steps – making the quilt sandwich, quilting it, and binding it.
I myself just quilted them in some basic zigzags, but obviously the options are endless.
Happy quilting. If you do end up making a quilt from this pattern, I would absolutely love to hear about it below.
J and I hired a babysitter tonight – what a treat! We always had lots of family help with P, but now that my brother has moved away, and my mother has more grandchildren competing for her attention we branched out. We didn’t even know what to do with ourselves! Sushi, bowling, then a walk around the neighbourhood. It felt quite heavenly, and I hope we can start doing this far more regularly. Think of the movies I can see, the funky new restaurants I can try. Yippee! M and P were reportedly very well behaved, and I’m sure we’ll hear their side tomorrow.
Today we found a rather ill bird outside our window. I suspect it flew into our kitchen windows, but I’m not sure. J held it to move it and said it was so light and beautiful. We did some reading on the Internet which said sometimes they just need awhile to recover and they do heal. I was a bit dubious, but we tried to remain optimistic. P got himself quite worked up that a cat might get it. He actually started to cry a bit. It was fascinating, as he’s never displayed that level of empathy to an animal before (least of all our beleaguered cat.) So we cut a hole in a milk jug and made a small shelter. We wrapped a towel around it to keep it warm. P and J went out for awhile. I went to check on it, and jumped back as I found only two little bird feet sticking in the air. I fetched a spade. I briefly contemplated a stark lesson about life and death, but then I decided the world doesn’t need to be that cold and hard at age 3. I told J to tell him it had miraculously recovered and flown away.
J told me later that P had said to him unprompted that he was “a little bit worried” about the bird. J told him I’d checked and the bird had flown away. “To his mummy and daddy?” P asked.
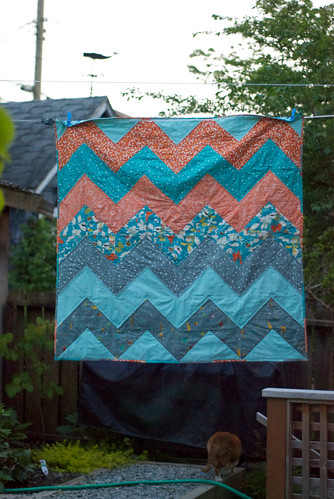
In other exciting news, I finally, finally, finally finished my rainbow quilt, so below are loads of pictures. The last one is the picture of the back. As you can see, a rainbow quilt needed a rainbow binding. I don’t remember what the binding fabric was, but I think it was something Ann Kelle. The whole quilt is about 64×80, but I’m almost wishing I’d made it bigger.
Oh and don’t look too closely as there’s a hanging thread in one shot, and yes, some of my stippling is kind of, um, rough. Stippling is the actual stitching ON the quilt, for the uninitiated – that sort of wavy lok. It took me quite a while to do, and my hands ached from moving the quilt back and forth. Next time I am definitely investing in some quilting gloves.
Anyway there are imperfections, but I don’t care – I love it and I keep pulling it off P’s bed to snuggle under. As I believe I mentioned before, I used Elizabeth Hartman’s Tiny Plates as a jumping off point, from her wonderful book The Practical Guide to Patchwork. I used her measurements for the blocks, but my own fabric “proportions.”


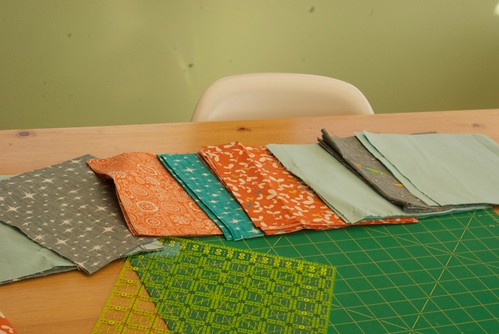
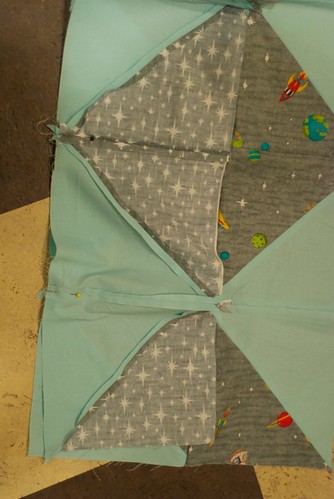
If you can believe it, I have still not finished binding my rainbow quilt, so no pictures yet of the finished product. But in the meantime, I have started another. Actually, the top and back are completely done, but I haven’t taken any photos yet. In the meantime, here’s a sneak preview. The colours are grey, orange and light blue. This quilt is for a baby and I didn’t know, when I chose the pattern, whether he or she was a boy or a girl, so I opted for boy and girl fabrics – grey rocket ships, and blue and orange flowers and butterflies.
I thought I might even get it done before the birth, but the day after I pieced together the top her mother sent me an e-mail to say the baby had been born almost a month early!

I’ve got to think of a better name for this than “Quilty Bag” but I just can’t stop calling it that. I decided, as a first try and free motion quilting, I’d start small. So I made this quilted sleep sack.
At some point I will do a real tutorial on this, as I’m quite proud of the idea.

Learned lots of skills while doing it though – it was my first try at improvisational quilting, adding a zipper, free motion quilting, and bias tape (I actually made this before the aprons I featured earlier, had just forgotten to blog it.) I’ve since quilted a quilt for P’s bed (to be featured soon!) so this was a great little project to whet my appetite. M likes it too, and I love knowing she’s warm and cosy even if she kicks off her other quilt.

Happiness is:
Getting all muddy in the garden:

Planted Victory Boxes

A quilt all laid out on the floor on a sunny day:
Little hands to help you with the pinning:

A big yawn in Daddy’s arms:

A date day with Mummy:

Itty-bitty bowling shoes:

You’ve probably forgotten about this quilt for P and M by now, but I keep plugging away at it. I have now finished all the blocks and am sewing together the quilt top. At one stage I thought I’d mix all the blocks together, but after laying it out that way, it was just too much. So I went back to my original idea of a rainbow quilt – stripes of red, orange, yellow, green and blue. I keep fussing with it and ripping out seams, but I really think I’m going to love it when I’m done.


For your viewing pleasure, some blocks I am doing for the quilt I am making for P & M. It’s got kind of a rainbow theme, so I’m doing red, orange, yellow, green and blue blocks. I finished the red and the orange ones today so that’s what you see. I was planning to just have 10 different fabrics total, 1 print and 1 solid in each colour. However, as usual I didn’t read the instructions carefully so I got partway through and realised I didn’t have enough of my carefully selected fabrics. Luckily I’ve built up quite the fabric stash now and had enough other prints on hand. I actually think it’s going to work out better this way – the more the merrier – especially since I know see how L-A-R-G-E it will be. I really love those little cowboys.

Prints pictured are:
Castle Peeps by Lizzy House
L’il Cowpokes from Michael Miller
Teddy’s Garden from Benartex
Aldo to Zippy by Jenn Ski

Two weeks ago I decided, somewhat on the spur of the moment, to take a quilting class at my local sewing lounge, Spool of Thread (which, by the way, is a very cool place with loads of gorgeous fabrics and very friendly owners.) I’ve always been intrigued by quilting, but somewhat intimidated.
The class was a Quilt in a Day class, where we did a simple patchwork quilt. I had so much fun! Sewing at a machine can be a bit of a solitary pursuit, so it was fun to do it in a group where we could chat, commiserate and, most of all, learn from each other. in the course I learned some basics of cutting, piecework and so on. I did learn that it’s a bad idea to choose a very geometric print for a patchwork quilt, but I still think it turned out quite nicely for a first effort! Excuse the picture – I had a tough time taking a good one and it was very dark.
Snuggle-tested and P approved!