The Twins Turn One

I almost forgot to mention a very important milestone around here – the twins had their birthday! I made a video, as I have for all my littles’ first birthdays. Theirs got to be extra long though, as I felt I had a license to be a bit self-indulgent since there are two of them.

I had mixed emotions as the day approached. Their birth was happy, but also terrifying. I was looking at photographs the other day of little B which J snapped soon after she was born. They are painful to look at. I realize how close she came to not making it. She was difficult to resuscitate. And then all the fears afterwards with C. But as my mother said to me, “THEY ARE WORTH CELEBRATING!” Yes they are.

We opted not to do cake or a big celebration. I didn’t even get them a present. Instead we brought 30 or 40 cupcakes and cookies to the NICU family lounge and left them there for the parents who have little ones there now. I hope we make it an annual tradition. I remember how I’d often just forget to eat because I’d be bundled up with a baby for several hours. Hopefully it brought a little bit of joy for some people in the thick of the never-ending NICU days. We also met up with two of our favourite nurses and they were able to have a snuggle with the little ones.

So here’s the video. I will warn you that the video contains many pictures of them when they were tiny preemies and it may be difficult for some to watch. But it also shows how far these brave little heroes have come!

Going, Going Gone

I’m a sucker for old houses. Really anything old – even cigar boxes, or vintage Valentine’s I find on eBay. I want to save all the houses. Even the ones where the windows are missing and sill is rotting.  Even the ones where the roof is caving in.  I drove my real estate agent crazy because I could always see potential.

There’s a house near me that breaks my heart. It’s a little 1920s two-storey bungalow, white with black trim and a sweet little gabled upstairs window. The yard is overgrown. The gate and fence, probably original to the home, are tumbling down. Evergreen trees that would have been babies when the house was born now tower over it, leaving the south side in complete shade.  Yet you know it wasn’t always shaded because there’s this hopeful little trellis there, which I imagine was covered in roses or something equally lovely 80 years ago.  In back lane, if you peer through the dusty windows, you can see delicate yellowed lace curtains.  I don’t know if anyone lives there – perhaps the owner died in her sleep years ago and no one has yet noticed.

A similar narrow little home sits a few block away, on a large double lot. An oil tank still sits in the backyard, and it appears it’s still being used as a heat source. A small path from the kitchen side of the house leads to a quaint little vegetable garden. The windows are old and rattling and the owner, who I do see from time to time, has put plastic wrap over them. The porch has not been painted in at least 20 years or more.  The house is ramshackle.  The large lot is worth over a million.

I stumbled across this Flickr set recently with pictures of a Vancouver that is disappearing.  My Vancouver.  Houses in my neighbourhood are being torn down weekly – as you can see from the phone snap I captured below. That was a few days ago, and the lot has already been dug out in preparation for a new place.  You can’t see it in my shot, but it killed me that upstairs there was a lovely moulded panel door being clawed at by the CAT.

The same photographer from the Flickr set took the shots below.  I remember this teal house.  I think it was even for sale at one point when J and I were house-hunting.  Gone now, apparently.

Perfect Moment

I love this motel, which is in an area undergoing rapid development. It’s so weird and wonderful.

City Centre Motel

For decades this coffee shop catered to a light-industrial part of the City. Around the time of the Olympics, the neighbourhood changed to become home to Whole Foods and Home Depot.  There are still car dealerships and some light industry there, but this is gone.

Molly's

A Word of Advice

I’m not big on parenting advice, or blog posts written in the second person but I’ll break both rules today to give one piece of advice. At least a couple of times a month, go somewhere you went before you had children. Go without your children. Make sure it’s a place where you are unlikely to have many interactions with children. Go by yourself for at least an hour.

The more children you have, the more difficult, yet important, this becomes.

My moment today: brunch in peace. Alone. Coffee drunk while still warm in a tiny restaurant where a stroller doesn’t fit. I’ve always loved being alone. Going to movies alone. Eating dinner alone. It’s funny that such an introvert would have so many children.

20140205-140235.jpg

Not a Crafter

You know despite my current blog byline, I actually do not consider myself crafty. Knitting and sewing is fine. But case in point, P wanted to make these paper diamonds. He spied the tutorial over my shoulder as I was looking at a simple knitting project on the same site. He was so sweet and patient cutting out the templates and then watching as I clumsily glued them together.

Yep. Nailed it.

Paper Diamonds, er, sort of!

Thankfully, P’s not too picky. He took one look and nodded. “Good.”

Reorg

I’m reorganising the categories of the blog a bit, so if you read this on an RSS reader, it may look like I published some new entries when in fact I was just editing older ones.

When my twins were in the NICU I was always trying to find blogs about babies who have been through something similar, particularly for multiples and particularly with for babies with the Grade III and Grade IV IVHs. I read quite a few of these blogs “cover-to-cover” trying to figure out what kind of outcomes were possible and what sort of symptoms I might see. Outrageous Fortune has been a wealth of information. I also frequently checked Cox Quads because it was one of the few that has followed the kids to an older age (they are now four) and she summarises some of the kids early visits and assessments with their paediatricians.

This blog isn’t just about prematurity. It’s really just a blog about my personal life, which involves a whole random assortment of things. But I know there are some people who come here via search engines searching for information about premature babies in the NICU, or about PPROM and possibly those people don’t want to sort through 20 posts about socks to just get to the answer: WHAT HAPPENED? Unfortunately I don’t have the answer… at least not yet. But at least now what I do know is a little easier to find.

Only Miss the Sun When It Starts to Snow

As I was driving to the hospital this morning a song came on the radio and I felt so optimistic. I thought, perhaps there is a silver lining in this journey. I mean, isn’t it true that you can’t know happiness until you’ve known some sadness? And there is hope!

And I held onto that feeling all day until I came home. Over dinner, I listened to the song again, but this time I felt utterly defeated. I just want to scream, “How, how, how, did this HAPPEN?”

During my whole bedrest, I was always optimistic. I mean, I had low moments but for the most part I felt like we were going to beat the odds. I was confident we’d get them to viability and beyond, even though every academic article on the issue said that was an extreme long shot. I was able to rationalise every statistic and why it didn’t apply to us. We did beat those odds. But then on Day 3 of life we had a devastating event, and the result was this bleed, which is extraordinarily rare at 30 weeks. Now that I’ve played those odds and lost, I feel like I’ve lost a lot of my optimism. When they say “She has a 70% chance of x” as if that’s a good thing, I can’t help but dwell on the 30%. And when they say there are things she may never achieve… well, I get stuck there. It’s very hard too, because we have been told different things – some people just frame the prognosis so much more pessimistically than others.

I need to get back in the “We are not a statistic” mindset. There ARE good stories out there, optimistic stories with happy endings. Google tells me so!

And at the end of the day, maybe I was crazy to think we’d get out unscathed. 95% of 30-week babies survive, but that still means that 5% don’t, and I’ve seen that firsthand now. My girls are still here and they are, outwardly anyway, healthy and strong. There is a lot of uncertainty ahead, but uncertainty also means possibility. She will tell us what she needs and what she can do better than any doctor can.

I know I will feel much happier once they are out of the NICU. It’s a tremendously stressful and sad place, so it’s very hard to live in the moment when you are there. Getting them home is my major goal. To graduate, they need to be off breathing support, be stable health wise (including no apnea, bradycardia or oxygen dips), and be feeding orally. They’ve done part one. I can’t control when they achieve part two, but I see improvements every day. So now I’m doing my damnedest on the third part. I’ve never had to train a baby to eat before, let alone dealt with two who can only stay awake for a few minutes and who tire after just a few moments of nursing. But we are going to get it done, because I think the best thing for all of us will just be being together again.

Bed Socks

20120726-105101.jpg

Summer heat continues and I keep on knitting with wool. These Churchmouse “bed socks” are a project I started a few weeks ago in June. In the interim I made some stuffed animals and those were really good practice. So I came back to these finding my technique and standards had both improved and these seemed very flawed. But since they are for strictly at home use I decided to finish them off and chalk it all up to a learning experience. My kitchener stitch, used for closing the toe, still needs work though! I found an awesome diagram in a book called Socks Master Class so I plan to practice it before I finish my next pair.

Keepsake Loot Bags

Kids love little bags, at least if my own is any indication. (Don’t you just love generalisations based on a sample size of one?) P loves to put his toys, or household effects in a small bag and carry them around. So when planning his party this year, I thought, why not do keepsake lootbags instead of the usual dollar store fare that disintegrates on contact? Yes, I am slightly insane. But in case you are equally insane, here is a “how-to.”

What you’ll need for 12 lootbags

  • 1/2 yard of a colourful fabric, 45″ in width
  • 1 yard of a solid (I used cheap muslin as it’s very affordable), also 45″ in width
  • coordinating thread
  • ruler, rotary mat and cutter (you can, of course, use scissors, but these tools will speed you up significantly)
  • a roll of ribbon; I think mine said it had 8 yards on it.
  • seam ripper (even if you don’t make any mistakes, you’ll still need this!)
  • a safety pin

A note before we start – I mostly used my serger to make this; a serger trims seam allowances, and also finishes them with a sort of overlock stitch.  You can still easily do this project without a serger, but you will want to finish the seams some other way.  The simplest way is just to sew a straight seam and use pinking shears on the seam allowances to prevent the fabric from fraying, but there are many other ways to finish seams too, and a quick Google will reveal many alternatives.  Onward:

1. First, lay out your half-yard of print fabric folded in half, so that when folded it measures 18″ by 22.5″; this is NOT selvedge to selvedge. Using your ruler and rotary cutter, cut out three columns, each 7″ wide; then cut the columns in half into 2 8″ high pieces; since the fabric is folded in half, you now have 12 rectangles that are each 7″ by 8″. The photo below shows what the fabric will look like when folded, and the chalk lines show where you would be cutting.

Cut lines for fabric

When measuring out your squares, don’t forget to leave a wee bit of space to cut off the fold.

2. Fold the solid fabric in half, like you did with the patterned fabric. Since it’s a yard, folded it will measures 36″ by 22.5″. Again cut three 7″ wide columns. Then cut horizontally so the columns are divided into four 7″ squares. It will look basically like the photo above except there will be three columns of FOUR squares, not two. Again, because the fabric was folded in half, you will now have 24 7″x7″ squares.

3. Sew a solid square to one of the 7″ sides of the patterned rectangle, right sides together; sew another solid square to the other side. It will look like this when you have sewed both squares on:

Three pieces
Repeat x 12.

4. You now have 12 long rectangles, each made up of three pieces of fabric. Fold them together, right sides together like so:

Sewing the Bag together

Sew along each side.

Sewing the sides of the bag

You now have the basic bag shape.

Basic Bag

Repeat for all 12 bags.

5. Now this is a perfectly respectable bag, and you can leave it like that if you want. But if you want to get really fun, you can “box” the sides of the bags. This will make the bags stand up a little more easily when there are things in them. It’s a little hard to explain how to do, but very easy, so please refer to the pictures below. Keep the bag inside-out, and pinch the corners as shown. Make a mark diagonally from the corner as shown. Sew a seam along that line. Repeat on the other side of the bag, and do the same for all 12.

Boxing the Corners 2

From another angle if that picture wasn’t clear enough:

Boxing the Corners

And here I am sewing along that line that I marked (although the line itself is not all that visible in this shot… but pretend it’s there!) Now my serger automatically cut off the little triangle for me, but if you are using a regular sewing machine, you will want to cut it off, leaving a half-inch seam allowance, (and you’ll also want to finish the seam.)

Boxing the Corners

Here’s how it will look once you have “boxed” both sides of the bag.

Boxed Corners

And see how cute it looks when it stands up (with something in it!) now?

6. Next step is to make the casing for the drawstring ribbon. With the bag still inside out, fold the upper hem down about 1/4 of an inch.

Then fold it over again, about the width of your ribbon, plus 1/4″.

Hemming

7. Turn the bag right side out; start right before one of the seams at the top of the casing, and sew zigzag stitches across the seam; then switch to a straight stitch and sew along the very top of the casing. Repeat at the bottom (including the zigzag stitch! That’s important!) of the casing.

Sorry, I guess it was the middle of the night when I took this shot, but here I am sewing the top of the casing. I’ve started right before the seam and am sewing a zigzag; once I “cross” the seam, I’ll switch to a straight stitch.

Once again, do the same for all 12 bags. My zigzags are kind of ugly, but no one will notice. What’s important is, they are there, and you’ll see why in the next step.

Zig Zag stitches on seam

8. Next, get out your trusty seam ripper and carefully pick apart the stitches between each zigzag, as shown. This creates a hole for you to put the ribbon through.

Seamripping

9. Cut your drawstrings. I think mine were about 18″ long, but I just eyeballed it and trimmed the excess. Basically you want to leave enough ribbon so that you can loop it through the bag and tied a knot in the end. You may want to leave a little extra so you can trim the ends of the ribbon. Put a safety pin on the end of your ribbon, and then thread the ribbon through the hole you made with your seam ripper… the bag will look like so:

10. Tie a knot in the end of the ribbon and presto! Finito. Now comes the fun part… deciding what to put in them! I like to do “consumables” so I’m thinking a wee thing of kid-friendly bubble bath, a cookie, and maybe some stickers.

Finished Lootbags

If you make these lootbags, I’d love to hear about it below! 🙂

Zigzag Quilt How-To

I thought I would branch out here and do a little how-to on my zigzag quilt, in case you are a novice like me who needs some assistanc in figuring these out.  I say novice and not beginner, because I do assume some quilting and sewing basics. If you are a total newbie, I highly recommend checking out books from the library like Elizabeth Hartman’s Practical Guide to Patchwork or Denyse Schmidt Quilts, both of which go over the basics of quilting.

Zig Zag Quilt

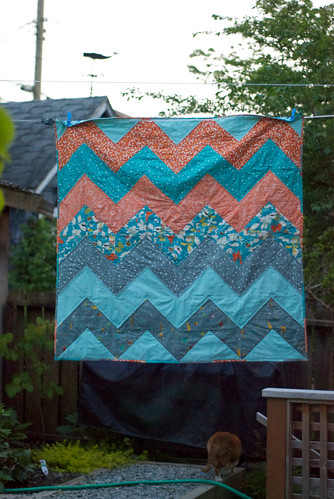
My finished quilt was approximately 50″ by 50″, so it was a generous baby-size quilt, or even lap quilt.

What you need:
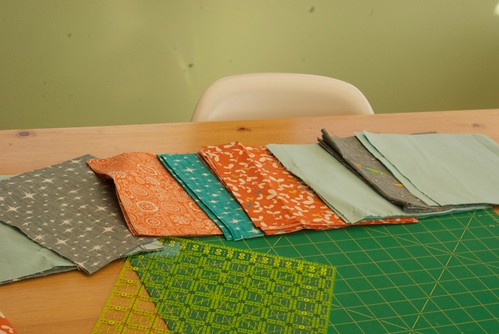
8 half-yards of fabrics of your choice (a total of 4 yards) (a half-yard is 18″ x 45″)
Rotary Cutter/Mat and Ruler
Note that you will also need batting and additional fabric for the back; there are many good tutorials out there on how to make a quilt sandwich, attach binding and actually quilt it all together, so this is just a tutorial (oooh fancy-schmancy word!) for how to make the quilt top, and I refer you to the books above for other steps.

I will also suggest that you read through all the instructions below so you know what the purpose of each step is.  If anything is unclear, please let me know and I’ll try to revise this.  I haven’t ever tried to write a tutorial before and I’m learning it’s not as easy as it seems.

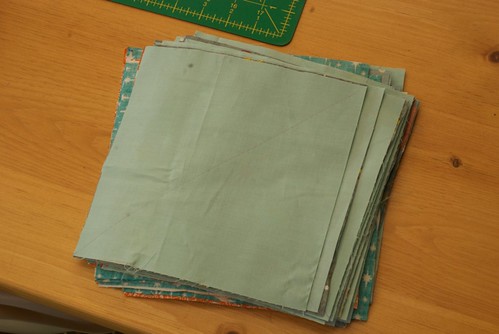
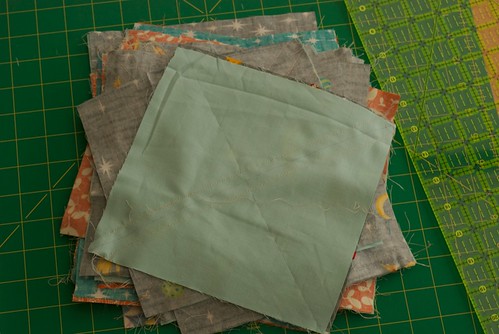
1. First!  Fold your half-yard in half, selvedge to selvedge, and cut it into two strips 8″ wide. Then cut those strips horizontally into 8″ squares.  Repeat with the remaining half-yards: you need 8 8″ squares in each of your fabrics.

Note, that you will have quite a bit of fabric left over. I turned my extra into bias binding and used it to bind my quilt

When you are done you will have 64 squares of fabric, as below.

2. Lay the squares out in the order you want them to be in the quilt; for example, my top row is baby blue, then the grey rocket ships etc.

3. Now this part is a bit hard to explain, but if your first row is baby blue, take FOUR of those eight baby-blue squares, and FOUR of your second row (orange in my case) and pair them up, so you have four piles of two.  Set the other squares from each row aside for now.

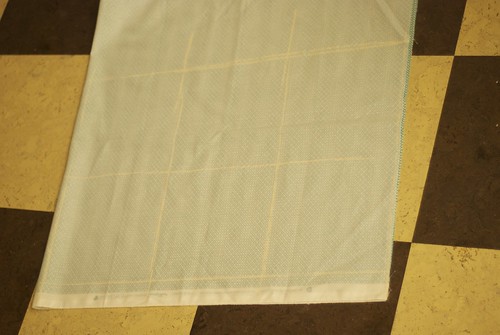
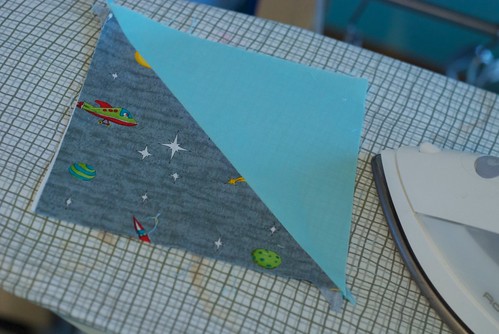
4. Using a washable fabric marker or fabric pencil, draw a diagonal line down the middle of top square in each of your pairs, like in the picture below. 

In my case, I drew a line down the eight baby blue squares, but not the gray squares.  (P.S. If you haven’t tested to see if your fabric marker is washable, DO!  Recently, I spent a good deal of time making something and the pencil did not wash out – serious bummer.)

5. Now, you’ve got your line.   Sew the two squares together using by sewing a seam one quarter-inch away from the line.   Then do another line of stitching a quarter-inch from the other side of the line.

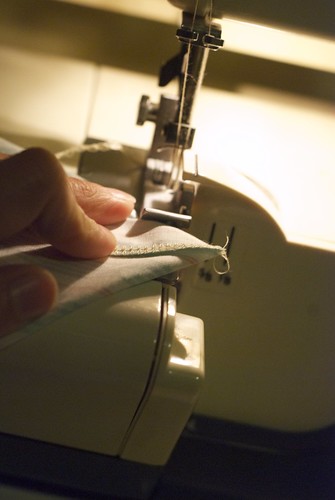
Here’s a picture of me sewing a seam down one side using my quarter-inch foot.  A quarter-inch foot is a good investment to make sure you get even quarter-inch seams.  If you don’t have a quarter-inch foot, you can use the lines on your sewing machine plate to ensure the lines are only a quarter-inch.  Whatever you do, make sure ALL the seams are the same width… so if you use a 3/8 width because that’s easiest for you given your sewing machine/feet, make sure ALL seams are 3/8.

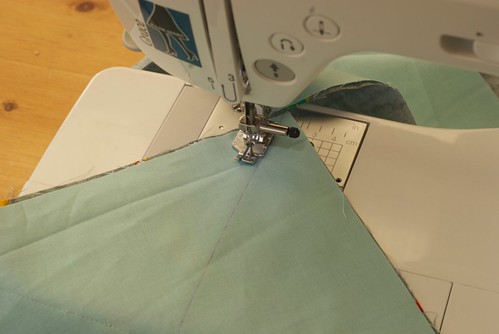
I found it easiest to chain-stitch them, so I sewed all the squares down one side, not cutting the thread between them. Then I fed them through the other way and sewed all the squares on the other side.

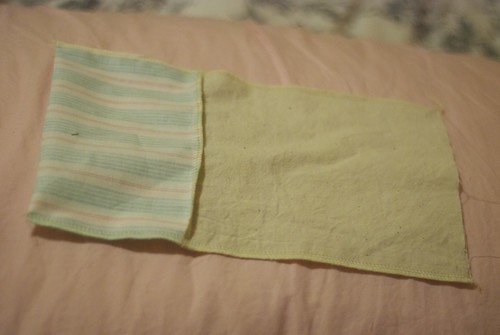
In the end, the square should look like this (Ignore the fact that it’s not the baby blue fabric; I guess I was working on a different row when I took this shot.):

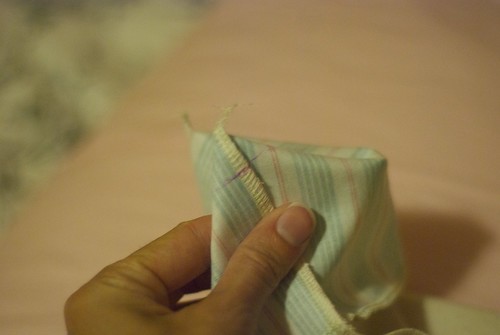
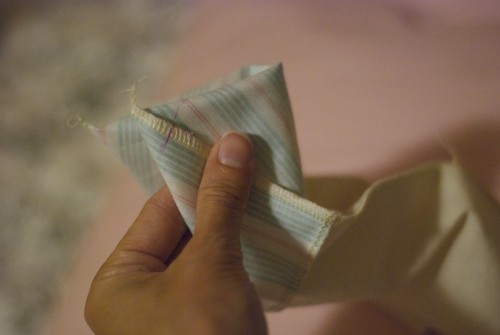
In this shot, you can see the chain stitching (and a crooked seam, which I likely had to redo):

6. Repeat steps 3-5 for the rest of the rows. In my case, I first sewed FOUR blue solid and FOUR orange leaves. Next I would sew four (can I stop capitalizing now?) orange leaves and four grey stars; next I’d do four grey stars and four orange flowers etc. etc. etc.

I know what you’re wondering. You’re thinking, but I cut eight from each fabric, and I only used four from my first row? At the very end you will use the left over four from your first row and combine them with four from your second-to-last row.

7. Snip the chain-stitching between each pair of squares.  Now you have 32 pairs of squares… hey, that rhymes.

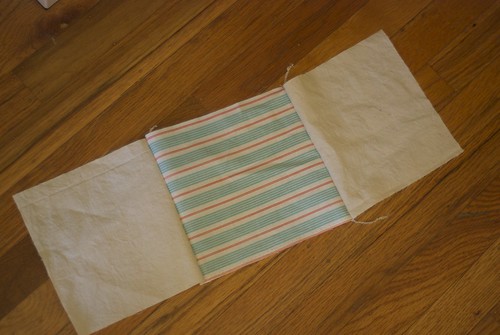
8. Now you are ready to cut. Remember that line you drew earlier, which is now between your two rows of stitching?  Using your ruler and your rotary cutter, cut each pair of squares along that line, like so:

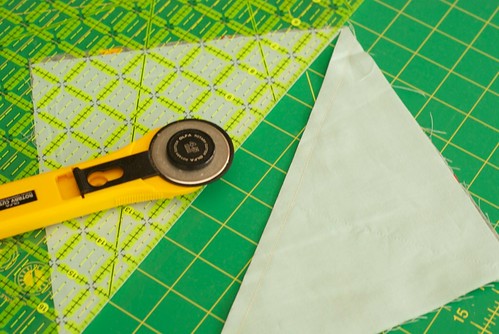
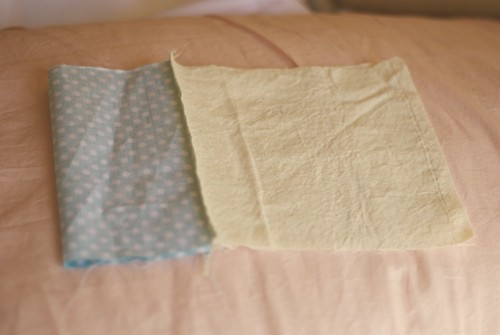
9. When you unfold each side of the pair you just cut, you will now have two squares that look like the picture below. Press them open.

10. Repeat steps 7 – 9 with the rest of your square pairs. You now, once again, have 64 squares, but now they are bicoloured.

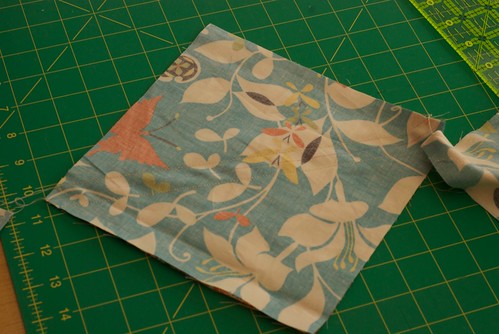
11. Lay out your squares in the zigzag pattern, and then sew the first eight of them into one long row (always right sides together!) using a quarter-inch seam. In the picture below, I have sewn three sets of squares into rows. Stop and look after each one you do, as it’s easy to become mixed up and get the alignment wrong, in which case your quilt will not be a zigzag and you will need to get the old seam-ripper out.

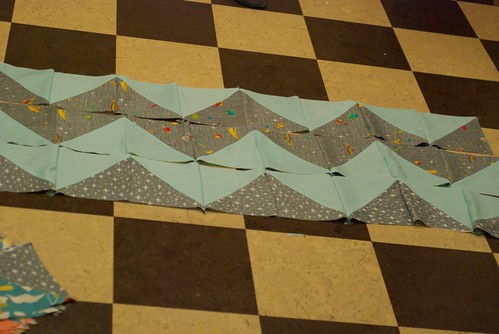
12. Don’t worry that your points look like this, as the extra fabric at the end of each point will disappear when you sew the rows together.

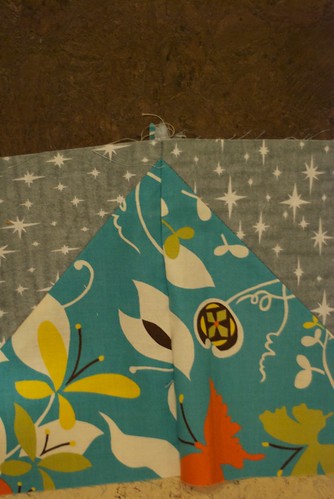
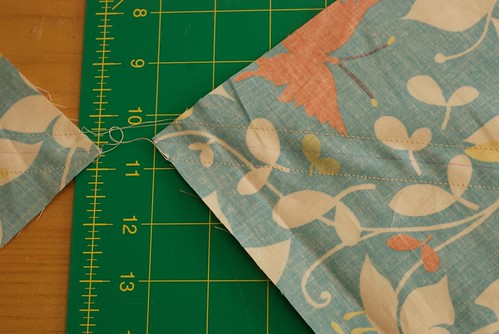
13. Sew each of the rows of 8 squares to the next row.

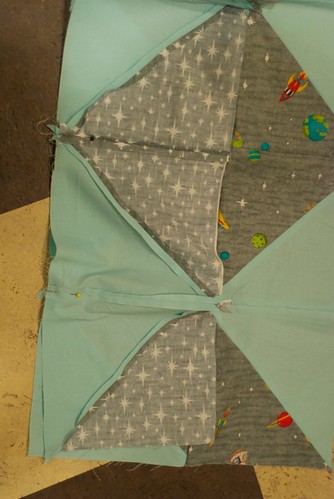
At this stage, it really helps to pin the rows together at each corner to make sure all the squares come together exactly at the seams, or at least as close as you can get. It may be that some of your squares are not exactly the same size, either because your seams weren’t all exactly the same, or your cutting was off by a bit. While it’s important to be as exact as you can, you can “cheat” a bit and play with the fabric stretching it slightly to get those points to match. In the end, don’t obsess over it because the recipient of your beautiful quilt certainly won’t.

Here’s a picture of the rows pinned together:

14.  And that’s it!  But I feel like it’s unlucky to have 13 steps, so I’m making it 14.   Once you’ve sewn the rows together, the quilt-top is done. As I mentioned above, I suggest Elizabeth Hartman’s site, or her book for tutorials on the next steps – making the quilt sandwich, quilting it, and binding it.

I myself just quilted them in some basic zigzags, but obviously the options are endless.

Happy quilting. If you do end up making a quilt from this pattern, I would absolutely love to hear about it below.