Colette Hazel Dress

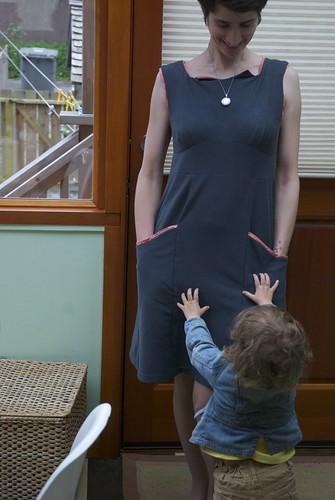
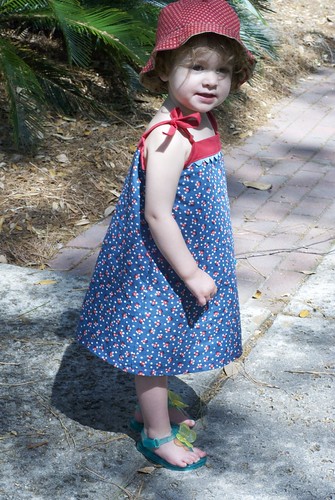
Spring is finally here in Van City and it’s sunny and gorgeous. I figured my spring wardrobe needed a refresh, so I made this simple sundress from Colette’s “Hazel” pattern.

This pattern is labelled “beginner” and it went together really quickly. It also has lots of tips throughout on seam finishing and so on, which would be very useful to a beginner. You don’t really need to worry about fitting waist and hips too much either because of the gathered skirt, so I only made a muslin of the bodice. And it has pockets, which is nice for those days when you head to the beach and realise it’s 10 degrees colder down there.

Colette Hazel Dress

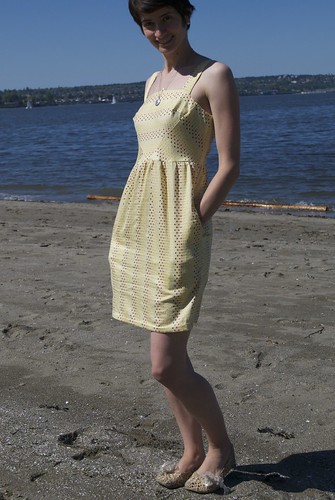
I loved the striped Hazels featured on the Colette website, so I made this out of some striped Lisette fabric I got on my last trip to the U.S. It actually wasn’t too fiddley getting the bodice to match up.

Colette Hazel

One thing to know about these Colette patterns, is that they seem to think that smaller sizes are shorter too. I’m not sure why that is, as the Big Four pattern companies like Simplicity and Vogue tend to just assume everyone is 5’6. For this Hazel, I cut the skirt out an inch or two longer than the size I was cutting out, and next time I might even add another inch or two to make it “safe-for-work”.

In looking around the Colette site, I came across this post which encourages people to try and wear something they’ve made every day for a month. I don’t have nearly enough “Made-By-Me” items to participate (though my kids certainly do!) but even so, this quote kind of struck me:

So, do you actually wear the clothes you spend time creating? Personally, I often find it too easy to find fault in my newly completed creations and at times used to shove them in a drawer and allow myself to be quickly distracted by the next project. But thankfully eventually, the ratio of drawer-fillers to wearable items began to shift.

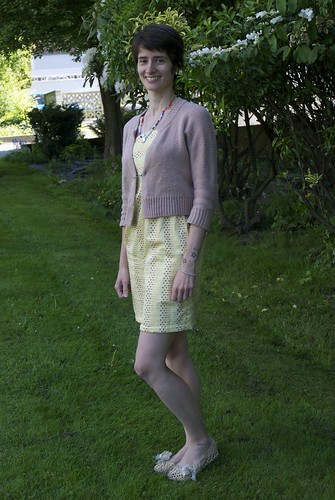
I do become kind of fixated on a crooked zipper, or slightly wrong fit when in fact many of my store-bought clothes, when examined closely, suffer from worse problems. So a month of “Made-By-Me” items is definitely something I aspire to in the near future as the ratio in my drawers changes. I’m also going to take pride in the fact that the invisible zipper on this dress is really and truly invisible, instead of focussing on where the stripes don’t exactly match up.

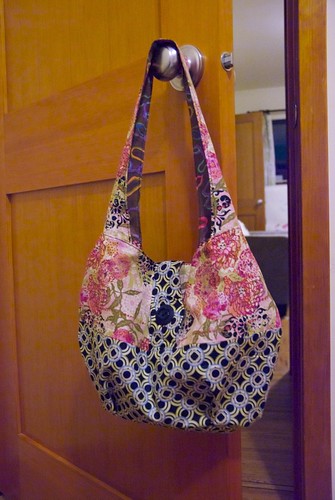
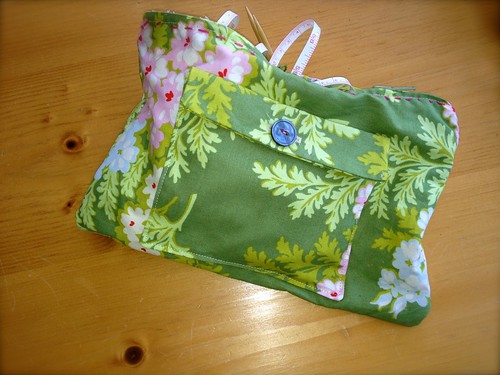
Oh, and Happy Mother’s Day to all! Unfortunately, I infected my own mother with the hideous stomach virus/cold flu that has been plaguing our home for the last week, so she wasn’t able to see the bag I got her, or join us for brunch and the walk on the beach… but I had a lovely meal at one of my favourite restaurants, Rain City Grill.

Split Personality Bag

This bag is a gift for someone. I don’t think she reads my blog very often (or ever!), so I’m probably safe posting it here, even if I haven’t given it to her yet. To give you a hint it’s for someone who is the subject of an upcoming holiday.

This pattern is the Split Personality Bag from the Straight Stitch Society line, which is another line by the brilliant Liesl Gibson of Oliver + S and Lisette. As usual this pattern features all kinds of neat details. First, the bag is completely reversible. There are no exposed seams anywhere either. I couldn’t quite visualize how it was all going to come together, but sure enough, it did. The instructions are detailed and helpful, just like O+S, but they do have a different, slightly ‘sassier’ tone. Did you ever think pattern instructions could be sassy? I do kind of wish that the patterns were available digitally though, as these little things are the perfect candidate for being printed on an 8 1/2 by 11 sheet.

Split Personality Bag - Side 2

So in case you couldn’t guess from my introductory paragraph, this bag is a gift for my mother. My mother is more of a fancy, Prada-bag type, but I think she will appreciate this for those summer Wednesday afternoons sipping coffee at Cafe Artigiano with the grandkids.

I’m always interested when I read about mother/daughter crafting duos, or women who learned to sew or knit from their mothers. I’m pretty sure 99% of crafting bloggers had a crafting mother or grandmother. My mother has (I am not exaggerating) zero interest in doing domestic crafts. She did sew a lion costume once for my brother’s school play, and did so entirely by hand as we didn’t have a machine. But aside from the odd button, that was probably the last thing she ever sewed.

When I made P one of his first pairs of pants, she said “Oh, so he will be dressed like a little hippie.” When I asked her if she was interested in taking a tote bag sewing class that I’m teaching she said, quite frankly, “No.” When I reminded her about my year-long challenge, she just said “Not for jeans I hope.” The hippie pants are still fresh in her mind I guess.

Split Personality Bag - Side 1

So crafting is not her thing. And maybe it will not be M or P’s thing either. But I do think she has a little bit of admiration for all the crafty stuff that I do. She bought me a “learn-to-knit” kit when I was six or seven, and my first sewing machine when I was 14. I think I’ll see her using this bag, at least on her grandkids days, which is once a week. She takes very good care of my two little people, even when they’re cranky, or have terrible stomach flu, or are just in the midst of a toddler tantrum.

And just in case she doesn’t like the bag, I’ll take her out for brunch too.

Zippy Bag

Nothing fancy here – just a little zippy bag to hold my knitting supplies or a small project. On the front is a wee pocket to hold all those pesky accessories, like stitch holders and markers.

On the back is a little vertical pocket to stick an extra pair of knitting needles or circulars into. Put a little embroidery thread across the top for a fun embellishment.

Untitled

I find I mostly knit on the bus, and too many times I’ll reach in to my purse to grab it and find it’s come loose from its needles. So it gets its own little portable pocket. P tried to co-opt this right away for his toys, but I hung on to my own bit of selfish sewing.

Itty-Bitty Baby Dress

Well, I had grand plans of making another baby quilt, but as the due date approaches I decided to rein in my ambitions in order to get it in the mail on time. This is for the future child of one of my bridesmaids. I made it out of some of Heather Bailey’s Nicey Jane fabric. I had some fat quarters lying around that just cried to be made into baby garments. I like the contrast of the big bold print and the smaller one. I appreciate that dresses aren’t the most practical things for summer newborns, but I tried to make it big enough so that it would fit in August, when, if memory serves, baby will be at least a couple of months old.

The colours aren’t quite right in this photo – my auto-white-balance setting was not liking the dark background with all that pink and green. My adjustments in iPhoto made it somewhat more true-to-life but it’s still not quite right. Don’t you love J’s hands holding the itty-bitty dress? Poor J, when he’s not taking pictures of me in my various creations (and being sharply critiqued for his photography skills), he’s being forced to model.

Itty-Bitty Baby Dress

The itty-bitty dress pattern is another freebie, found on Made-By-Rae’s awesome site.

Rooibos Dress

This is the story of my Rooibos dress… the most ambitious thing I’ve sewn to date, at least for myself.

I made a muslin! I finally made a muslin. And it was SO worth it. It really takes so little time since you don’t have to hem or do facings. And it’s only a couple of minutes of cutting. I figured that I’d make the size that fit my waist and hips, even though my upper body warranted a lower size according to the package. I painstakingly tissue-fitted, did my small bust adjustment, figured out the construction, and put it all together. The bodice was great, but the rest was still ginormous! But it helped me figure out the size I did need, 2 sizes down. The small bust adjustment I’d worked out was basically the same as the smaller pattern piece, so I went with that instead.

I made it out of ponte knit, which is a synthetic. Normally I stay away from synthetics, but I was attracted to the idea of a knit that acts like a woven. At least that’s what I’d read. I ordered it sight unseen, so I wasn’t entirely sure what I was getting. I’m not sure it really does act like a woven though – it’s pretty stretchy. I used a walking foot to feed the material through my machine, as it was also quite thick.

It is so, so comfy. I love it. I kind of wish I’d chosen a different fabric for the piping. I like the colour, but I’m not sure they go. Still, I wore it to work and even got a couple of compliments! Sorry though, you are not getting a photo of me in this dress without a child in it.

Rooibos Dress

Also, I need to hand-tack down that collar thing. The instructions recommend it, but I didn’t as I though pressing would be enough. See, there you go:

Rooibos

Sundress

This is my second popover sundress, but my first for M. I subconsciously chose fabrics very similar to this blog post. What can I say? It’s a classic, it sews up super fast, and best of all, the pattern is free! I decorated it with a little ric-rac too.

Popover Sundress

West Coast Blouse

My sister-in-law, who is an artist, recently launched a fabric design company. (You can also find them on Facebook. Her designs are very much inspired by nature – very organic. They kind of remind me of a West Coast Lotta Jansdotter. I got some of her organic sateen fabric recently in her “Branching Out” pattern.

I decided to make a top with it to really showcase the design. I chose the Pendrell Top by Sewaholic. Sewaholic is a recent discovery for me – found them through my fabulous local shop, Spool of Thread, and they are also Vancouver (well, Burnaby)-based which is super-cool. I just started reading through Sewaholic’s blog and she has so much great information on there – it’s very inspiring.

Et voila – here’s what happens when you mix a BC fabric designer and a BC pattern designer – something very West Coast.

Untitled

Pendrell Top in fabric by Forsythia Design

KCWC Last Day – Sailor Pants

Last day of KCWC, and this is my last kids’ project for a bit – some sailor pants for P.

Untitled

These are the Oliver+S Sailboat pants. I love this pants pattern and have made it a couple of times now. It was briefly out-of-print, but is now available digitally. There’s also a skirt option, which I haven’t made yet.

I did the pants with piping this time, and I found some nautical-themed buttons. The fabric is a fine-wale corduroy that’s been kicking around in my stash for a while. The waistband is a little folded over in the picture, but it’s not actually uneven when properly adjusted. I just didn’t notice it at the time.

Added: Thought I would add one teensy note about the piping since a friend asked about it on my Flickr page. In brief, I basted the piping to the right side of the pant piece before sewing on the facing to the facing. You line up the raw edge of the piping with the raw edge of the pants. I used a zipper foot to get as close to the cording as possible, and clipped into the piping seam allowance around the corners. It bends more easily than you’d think but lots of pins are very helpful! Then, when I attached the facing, I was able to sew over the basting line, essentially tracing the basting line. If this doesn’t make much sense, there’s a much more in-depth tutorial on piping here. I just used store bought piping but you can also really customise by making your own.

Japanese Children’s Vest

This vest is from the somewhat pointless, but oh-so-adorable files.

Japanese Vest

There’s a passage in one of Nigella Lawson’s cookbooks where she explains that she is a late-night Amazon shopper, always ordering cookbooks. I was channelling Nigella one late night when I ordered this children’s Japanese pattern book. It has about 12 different projects in it, each of which can be made in different versions, like a blouse that can also be a shirt or tank.

I decided to steer clear of the obvious dresses for KCWC and I thought I’d make her a pretty accessory, so I made this vest. It was actually a very simple pattern but it took me longer than it should have because, well, the instructions were in Japanese. There were plenty of illustrations, so I actually would have been fine if I’d followed them carefully instead of trying to think ahead two steps. But it all got figured out eventually once I decided to just do exactly as the pictures required and trust that it would come together. After reading Forsythia Design’s post about her Stylish Dress Book it occurred to me to check if the patterns have seam allowances, and I gleaned from the illustrations that they do not, so that is something else to keep in mind.

In the end, the garment construction was actually quite ingenious, and leads to a fully lined, reversible vest. I think it’s a cute way to dress up some of the brother’s hand-me-downs.

Japanese Children's Vest

I really prefer the black and white version, but getting any extraneous article of clothing on an almost 2-year old is a challenge, so I didn’t dare trying to convince her to reverse it for another picture. Might have to shorten those ties though. If I made it again, it might be nice to use a ribbon in a colour that compliments both sides as ties instead.

Sew Lisette Blog

I’m having my 15 minutes of Fame on the Internet! I’m featured over on the SewLisette blog wearing the Souvenir shorts I made a couple of weeks ago!

They do a feature on Fridays where they show people wearing versions of the clothes they’ve made. I’m trying to burn through my stash right now rather than buy new fabric, so I have to dig out the pieces I have which would be big enough to make a dress for myself. I’m dying to make the Souvenir blouse too, or maybe even the whole dress. The other one I want to do is the Diplomat. I have a muslin done for that, but it needs a few adjustments. After I’ve done my Kids’ Clothes Week Challenge I definitely need to do some summer sewing for myself.