Just in Time for Oscar Night

Remembered at about 10:30 that I have to make a snack for a party I’m going to tonight… it’s a snowy day and I didn’t want to leave the house so I scoured the place for ingredients. Then inspiration struck – popcorn balls! I forgot how easy it is to make popcorn. I coated the bottom of a pan in vegetable oil, put down a layer of kernels and turned the stove to medium. The baby needed a change so I rushed off to get her dressed. When I came back to check on my popcorn, I opened the lid to find this:

Then I made the caramel. Needed:
1/2 cup unsalted butter
1 1/2 cups of loosely packed brown sugar
1 tsp salt (or none if you’re using salted butter)
a candy thermometer
(This will make enough for 12-16 cups of popped corn depending on how caramelly you want it)

Put the caramel ingredients on the boil and keep a close eye on the thermometer. Once it gets to 234F, aka the softball stage. Drizzle it over your corn and mix quickly.

Caramel bubbling on the stove

If you want to make popcorn balls, as I did, act quickly before the caramel cools. But it’s also really tasty just to eat it without balling it up. Mmmmmm.

New Pants!

I’ve been doing a lot of sewing for M lately. You might think that’s just because she’s a girl, and sewing cute girl stuff is more fun, but really it’s not. Sewing pants is just as fun as sewing a dress. P just has so many clothes right now that I really can’t justify making him anything. I’m sure I will soon, but I need him to have a growth spurt first. Or maybe a change of seasons. If I had some sweatshirt fabric I’d make him a sweatshirt, but, well, I don’t.

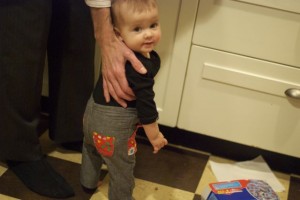
Anyway, here are some pants I made for M. They are lined, and it was my first attempt at lining anything. I didn’t have a proper pattern for the pant legs, so I based it on another pair of pants she has, but sizing is still not my forte. They are a bit, um, snug. Her enormous cloth diaper bum doesn’t help either. Still, we will wrestle her in and out of them a few times, I’m sure!

I’m also working on a quilted baby sleep sack for her, which is coming along nicely. But I think my next project should be for P. Maybe this car house. It would definitely get a lot of use in this house!

Still Life

Sometimes I’m wandering around the house, cleaning up cars for the eightieth time after the kids have gone to bed, and I stumble upon these little scenes of life at our house. Little reminders of their habits. I take so many pictures of the kids, but as great as it is to have a close-up of a baby, sometimes it’s nice to just capture the context.

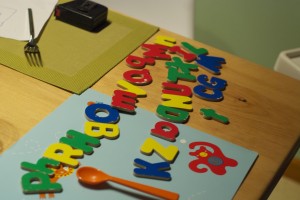
Right now P loves letters. He recognises most of them, and knows the sounds, but hasn’t yet made the giant leap to stringing them all together. It occurred to me that there are so many parts to reading – learning the letters is one thing, but you also have to learn, for example, that you read left to right, that you can’t just jumble them up in any order, or that words are predefined, not just made up on the spot.

P loves to string letters together for me to “read” them, and I found this scene on our dinner table last night. As you can see, he spelled “Phrbomvqqmnkzadnutxiltcgm.”

Things I Carry

What do I carry with me? A big stuffed black bag, but it’s never enough. I’ve been known to text friends in the vicinity of where I’m going to say “Can you meet me outside the community centre? I forgot my wipes!” Sometimes I forget snacks too, and my son chows down on a dry cracker while looking up at me and saying “But I’m hungry Mama!”

I carry worries with me too. At first I tried to stop myself from worrying, afraid that I would attract negativity in my life. But it proved impossible. “Worry is the work of motherhood” said one of my pregnancy books. And so I embraced it. For a while I thought if I thought about it, it was unlikely to happen. So I tried to worry about every possible thing that might happen, knowing that if I considered it, it would probably never occur. Would Grandma drop P in the bath while I was gone? Would the daycare provider hold his hand tightly when he crossed the street? Would the sitter let M play with the toddler toys that have too many small pieces? I roll over all the possibilities in my mind, almost as if I could just think it, I could prevent it.

Despite all this baggage, I think there are some things I’m good at not carrying. Guilt. If worry is the work of motherhood, then guilt is the cranky colleague – always looking over her shoulder and second-guessing her. Don’t feed the baby that Mum-mum – there’s no nutrition in it! You shouldn’t have let her cry for so long in the back of the car! Your son hits you? You must be doing something wrong to have a kid who hits you! You work? You stay at home?? When I hear that little voice I push it away – I throw it away, along with the used up wet wipes, the soggy diapers, the pieces of paper and pinecones my son collects along the road on the way to the park. And some of the time, I succeed.

Crafty Friday Fail

I can’t believe I’m messing up on crafty Friday already and have no completed or in progress crafts to show you. Part of it is that I’m away from my computer so I can’t get to my photos. Also, my project last weekend was a bit of a “fail.”

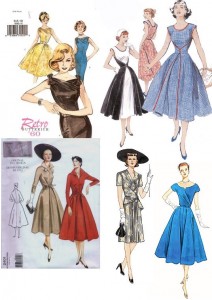
I decided to make a dress from a vintage dress pattern. Maybe I watch too much Mad Men, but those mid-century fashions are so gorgeous yet simple. I’ve collected a few ’50s and ’60s patterns but this weekend was my first effort at putting one together. The dress went together very nicely, but it was far too small so I got frustrated and took it all apart.

Here’s some lessons learned on working with vintage patterns. First they are all sized – something I didn’t know when buying my first one. Many (most? all?) modern patterns tell you wear to cut if you are a size 4 or a size 8 or a size 14, but the old ones just came in one size, so it’s important to get the right one unless you want to be troubled with resizing. Most of them have measurements on the back.

Second, the sizes mean nothing to the modern person. For example, my “vintage” size is about 10 sizes bigger than what I wear at, say, the Gap.

Finally, even if you “match” the measurements, it’s a good idea to baste your seams (so you can undo them easily if necessary) or even make a muslin. I’m quite convinced women were proportioned differently back then. Or maybe they just wore giant bras and very restrictive undergarments, I don’t know. All I know is that I tried to make the dress according to my measurements, but it was still itty-bitty on me. I was grateful that I used very inexpensive fabric, which I’ll eventually recycle into something else.

And my last note is that vintage patterns assume a lot of knowledge which the modern brand-new seamstress may not know. For example you’ll be plugging along it was say “Do x, y, z” and you’ll do x, y and z and then realise the rest of the sentence was “Do x, y, z having done a, b and c.”

I will make the pattern again and will show it off when I do. But I have a few other projects I’m keen to work on too.

It was still a lot of fun – that crinkly aged paper, cut by some person long ago, the adorable drawings on the pattern envelope. As always I learned a lot. I want to grab some kids vintage patterns too – maybe a ’70s dress or set of overalls. That would be fun.

Dressew

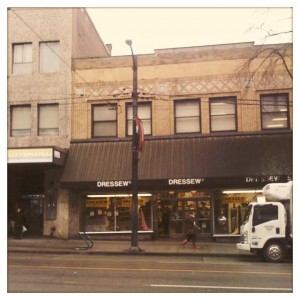
Dressew is more than a fabric store, it’s a Vancouver institution. Located on East Hastings, not far from the infamous Main & Hastings intersection, it’s a relic of a past time. The lights are fluorescent, the floor is dingy white linoleum and the place is floor to ceiling full of supplies for sewing, knitting and quilting. On a typical weekday it is buzzing, with bespectacled senior citizens leaning over quilting supplies, well-dressed men in shiny shoes poring over home dec fabrics, girls barely out of their teens dressed like runway models choosing buttons. You might even see a mommy with a sleeping baby on her back.

The place isn’t the best for modern fabrics – although I noticed some Amy Butler and Michael Miller. But if you’re looking to make some clothes or bags, or there are tons of options – canvas, denim, fleece, flannel, bits of leather and a whole aisle of upholstery fabric. But since it’s hard to rummage through fabric with a baby in a carrier, I find the real joy of the store is the bottom floor. Holy cow. Buttons and buttons and buttons in every possible imaginable colour. Another aisle of zippers! Next time I’ll work up the courage to take some photos inside. The buttons would blow your mind. And supplies at rock bottom prices. I picked up a narrow (gridless) self-healing mat for $4.99 and a small quilting ruler for $2.99. I found quilting pins for 99 cents. Extra seam ripper for 25 cents (at my level you can never have too many!)

I’ve heard that Dressew might be closing soon, or that it’s struggling. It isn’t apparent to me from the dozens of people that have been in there the last two times I’ve shopped there. But if it’s true, it will be devastating for the city. I don’t think there’s another store with this variety of stuff in the city limits, let alone the downtown core. I do buy a lot of things online, but I definitely make the effort to support this and other bricks and mortar fabric stores. Online shopping is great, but there are times when you need to feel the fabric, or buy some random supply you didn’t even realise you needed until you saw it on sale for 35 cents.

Sleep

When M slept 8 hours at just a few months of age, I thought I had it made. This baby was going to be different… she would sleep! She has yet to repeat her 8 hour trick. I think maybe it’s not them, it’s me. I broke her, because I like to cuddle with her at night, and now she doesn’t want to do without the cuddle. Or maybe she’s just a typical eight-month old hitting her separation anxiety stage. Oh but wait, she’s been doing this for four months. Hm.

She does not like to sleep, at least not unless someone is very close to her. I do have my moments of frustration, especially when she wakes up before I’ve even finished clearing up dinner, where I just want to scream “GO TO BED!” at my poor blinky-eyed baby, her lip quivering in her little pink sleeper. But at least this time I know it doesn’t last forever. Soon she’ll sleep through a jackhammer, just like her big brother. Or maybe she’ll put herself to sleep playing with her cars. And then she’ll regress and want you to stay with her every night because she’s afraid of the dark, or the “blinking noise” (I think it’s the furnace.) And then she’ll sleep through the night a stretch, and then she won’t. This sleep thing, it’s not linear. And I guess deep down, I like my snuggles more than I like my sleep. Just wish I could have both.

Peanut Butter Bars

On a recent trip to the grocery store, I saw some steel cut oats, and thought “Hey, didn’t someone say those were healthier than regular oats?” So I bought some, but of course I never, ever remember to soak them the night before. And so poor P doesn’t get his oatmeal. The one time I did remember to soak them he said “Mama, I don’t LIKE this kind of oatmeal!” Which got me thinking, what’s so bad about rolled oats anyway? Aren’t they pretty healthy too? Shouldn’t I just be thankful my kid actually eats oatmeal? And so I went back to quick oats. But those darned steel cut oats – I wasn’t sure what to do with them. So I decided to bake with them.

I adapted a recipe from Rebar, one of my favourite cookbooks. I’m not sure if baking with steel cut oats is “accepted” but I found they gave the bars a very appealing texture – sort of as if I’d made the bars with chunky peanut butter instead. Sure, you could just go buy chunky peanut butter if you wanted that texture, but the goal here is using up those oats! If you are the kind of person who actually remember to soak oats, or never buys steel cut ones in the first place, you can also use regular oats, although the texture will be different. The original Rebar version also has a very yummy icing, but I left that off in order to make these into an every day “can go in P’s lunch” kind of treat.

You’ll need:
1/2 cup butter, softened
1/3 cup brown sugar
1/3 cup white sugar
1/3 cup peanut butter (preferably smooth!)
1 egg
1/2 tsp vanilla
3/4 cup steel cut oats
1 cup flour
1/2 tsp baking soda
1/4 tsp salt
Half a bag of chocolate chips

Soften the PB and butter and then mix with the sugars – I used a KitchenAid but any mixer will do. Add the egg and vanilla to the wet mixture too. In a separate bowl, combine the oats, flour, baking soda and salt. Once combined, add the dry mixture to the peanut butter mix and stir well. Throw in as many chocolate chips as you like. Spread mixture in an 8×8 buttered pan and cook at 350F for 25 minutes.

Mmmm. They were gone in a day.

Pinterest

Someone forwarded me this link and an “invite” to Pinterest. This site is totally up my alley – I have a huge folder in my Documents of “Ideas” – pictures I paste off the Internet and file away for future reference. This is a perfect way to do it in the cloud, and of course it has a social networking aspect to it as well, so you can get ideas form other people’s virtual bulletin boards. Trying to figure out a way to put it in my sidebar… got to find a Widget. If anyone wants an invite, let me know – I think I can give out invites although I’m not totally sure.

Introducing Crafty Friday

So I’ve been thinking more about how this blog is going to work. Part of it is just personal stuff – me writing a record to keep of my beautiful babies and life and so on. But I know that isn’t enough to sustain my blog, from past experience. So to keep me moving and motivated, I thought I’d have some “theme” days. Fridays are going to be crafty Fridays. There might be more craft stuff in between, or more recipes, or just a lot more blabbing about me. But without further ado, here is our first official Crafty Friday post.

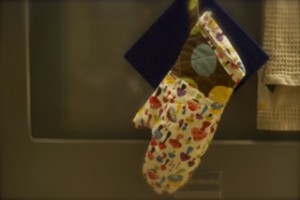
To learn some quilting projects, I have been working my way through Denyse Schmidt’s book. She has a lot of great little projects in it, as well as some full size quilts. This isn’t the most glamourous one, but it is useful! I had some leftover batting and fabrics around, so I whipped this up to practice some machine quilting techniques. I tried my hand at freehanding on the back (which looks pretty bad), and did some purposely crooked lines on the front. I lined the inside with an old receiving blanket to add extra protection. I probably should have used some extra batting, because it’s not something I’d want to carry a hot plate across the room. But since I have a small kitchen it’s working fine, and it certainly looks better than the two burnt, stained mitts that used to be hanging on my stove!